Thursday, December 12, 2013

Take-out Fake Out-- Crispy Lemon Chicken

I love making Chinese food at home.  It tastes just as good without all the added salt and MSG- not to mention it's a whole lot cheaper too.   I ripped this recipe out of a magazine a few years ago and it has become one of my favorites, even the kids love it!  The batter on the chicken is both light and crunchy and the lemon curd makes a great sauce served over jasmine rice. 

Now to warn you, there is a fair amount of multi-tasking to be done when making this recipe but after you do it a few times and get into a groove you will see that you can cut the prep time down significantly.  

The original version is deep fried and tastes just like take out, which is how I prefer it,  however other times I've also just sauteed everything together instead  in a little oil and it comes out great that way too.  Try them both!

What do I need???
- 3/4 cup lemon curd (in the aisle with the jelly)
- 1/3 cup rice vinegar (Asian food aisle)
- canola or peanut oil for deep frying
- 3/4 cup flour
- 1/2 cup cornstarch
- 1 tablespoon baking powder
- 1 lb boneless chicken thighs cut into 1 inch pieces
- 1 lg red bell pepper cut into matchsticks
- 1 bunch of scallions cut into 2 inch pieces
- jasmine rice

Total Prep and Cook Time- 45 min, Serves 4

First make up the sauce.  In a bowl whisk together the lemon curd, rice vinegar, and 1/2 tsp salt. The original recipe called for 1 cup of the lemon curd but I thought it was  a bit too lemony that way so I cut the amount.


Then get your oil heating up in a large heavy bottom pot (or even better use a dutch oven if you have one, I had mentioned before it's one of my all-time favorite kitchen items!) You want the oil about 2 inches deep.  Use a candy thermometer to heat to 350 degrees. If you don't have one heat until a little bit of batter sizzles when you drop it in...


Preheat oven to 200 degrees and place a cooling rack on a baking sheet to keep chicken warm while you cook the batches. . .


While your oil is heating up start the rice, chop up your vegetables and cut up the chicken...


Now it's time to make the batter. Grab another medium sized bowl and whisk together 1 cup water, 3/4 cup flour, the cornstarch, baking powder, and 1/2 tsp salt . .


Coat the chicken lightly in 2 tablespoons flour (you can do this in a large zip-lock bag). Then toss the pieces in the batter and then into hot oil carefully one at a time using tongs. 


You will need to separate the chicken into 3 batches so that you don't end up overcrowding the pan which will lower the oil temp.  Fry until golden, about 5 minutes.  Using slotted spoon transfer cooked chicken to the rack in the oven to keep warm... 


 Fry the remaining chicken, then add the peppers and scallions to the hot oil and fry until crisp-tender, about 2 minutes. Remove with slotted spoon and place on plate covered in paper towel to blot the excess oil. Then place in dish with cooked chicken. 


Pour lemon sauce over the chicken and vegetables and toss to coat.


Transfer to bowl and serve over rice, spooning extra sauce on top...


*Wanna switch it up?!!**
- substitute chicken breast or pork loin for thighs. 
- substitute orange marmalade for lemon curd 

Buon appetito!


Tuesday, November 26, 2013

Turkey Day Treat- Bourbon Pumpkin Pie

Thanksgiving is just a day away but there is still time to whip up an awesome homemade dessert that is sure to put you in that blissful food coma. I ripped this recipe out of a magazine a few years ago and have made this recipe for the last few Thanksgivings. It's a nice twist on traditional pumpkin pie with a tang from the sour cream and a spiciness from the liquor. Super easy to make as you throw everything in one bowl! Top it with homemade whipped cream infused with a little extra bourbon and it's even better!


Ingredients
15 oz can pumpkin purée
1 cup heavy cream
1/3 cup sour cream
3/4 cup sugar
2 eggs
3-4 tbsp bourbon
1 tsp cinammon
2 tsp pumpkin pie spice
1/4 tsp salt 
1 ready- made pie crust (deep dish)

Total prep and cook time 50 min
Makes a 9 inch deep dish pie 

Preheat oven to 375 F

In a large bowl add your pumpkin purée. I prefer organic because I really think it has a better pumpkin taste and nice deep orange color. . .

Next add all your other ingredients on in! Tailor the cinnamon and pumpkin pie spice amounts to your liking. If you don't have pumpkin pie spice laying around you can sub in some cloves, ginger, and allspice..

Once everything is in the bowl give it a few stirs with a wire whisk until it's all uniform in color and incorporated through. Make sure those egg yolks got broken up and mixed in...

Lay out your pie crust in a 9 inch deep dish pie plate. Pinch around the edges to give it some shape.  You could also buy a pre-formed crust in the frozen section instead but I think the roll out ready crust has more of a homemade taste and texture. And of course you can make your own!   ( I'm hosting this year so with all the other cooking store bought it is!)

Fill it up with the mixture to the very top and pop it in the oven, middle rack for 45 minutes. 

When it's done it should be firm and set around the edges and still a little jiggly in the middle. Cool completely on wire rack. 


This pie can be made 1-2 days ahead and stored in fridge. Just bring to room temperature before serving. 


Happy Thanksgiving!!

Saturday, November 23, 2013

Soup's On- Pasta e Fagioli


Once the weather starts to turn cold, I love me some good ole pasta e fagioli (pronounced by my family's italian slang as "fah-jul" ).  Most Italians were raised on some form of this stuff.  Like many other italian favorites such as pizza and polenta, pasta e fagioli is considered a traditional peasant dish, being made of inexpensive ingredients.  Recipes online vary anywhere from a chop suey- type dish to a thick meaty stew. My family's version is a meatless tomato broth soup with potatoes to make it more hearty.  This is quick, cheap and easy to make and is a great way to use up left over pasta and gravy! I personally think it tastes even better one or two days after it's made, making it a great do-ahead meal, perfect for a busy week night dinner.

It's definitely a childhood winter favorite of mine and soon to be yours too!


What do I need???
- 32 oz chicken or beef broth
- 1 can cannelleni beans
- 1 can dark red kidney beans
- 2-3 potatoes, peeled and cubed, (I prefer yukon gold)
- 1 cup small pasta shape (ditalini is my usual go-to)
- 1 cup tomato sauce
- parmasean cheese

Total Prep and Cook Time- 35 min, Serves 4-6


First get your potatoes peeled and chopped.  Don't worry about making them too small, you will mash them up later.  No potatoes on hand?- you can use instant potatoes later on in the recipe instead.  


Next fill a tall pot with the box of broth and another 4 cups of water.  You can use any broth you like and can use all broth instead of water as well.  Also can use all water with a few bullion cubes.Toss the potatoes on in and bring to a boil.


Simmer on medium heat for 15-20 minutes until potatoes are soft.   Once potatoes are soft, smash them up right in the pan with a potato masher. 


Cook small pasta in separate pan according to directions. I usually use the ditalini shape but today had acini di pepe so used those instead.  You really can use any shape you want but if they are too big it will soak up all the broth and you want them to easily fit on the spoon with the beans. 

Open cans of beans and rinse under cold water. I like to use two kinds and so I put in 1/2 can of each but you can do what you like. 

Toss everything on into the pot... If you wanted to use the mashed potato flakes now would be the time to stir some in! (to make it as thick as you want)


Last step is to add the sauce (gravy!).  I prefer to strain out any chunks for this soup so i put it through a little sieve and stir it in.  If you don't have left over sauce you can buy a small can of tomato sauce (Hunts etc).  You don't need any fancy jar stuff.  Add as much as you like to make the soup as thick as you like....


Grate a whole pile of Parmesan or Romano cheese over the top and you are good to go! 


Wanna switch it up?!  Add cooked ground beef, shredded chicken or bulk sausage to the soup to boost the protein.  Wilt in baby spinach or escarole for some greens.  Sometimes I use my immersion blender to really mash up the potatoes to make it more of a creamy tomato bisque consistency rather than the thin soup.


Thursday, November 21, 2013

5/5/15 Salmon with Roasted Roots and Veggies

5 ingredients or less
5 minute prep
15 minutes to cook. . 

We all need some of these for the hectic weeknights. This is one of my "go- to" backup meals for those nights when things don't go quite as planned (read miss darn commuter rail). I say this because it is more of a method than a recipe and is very versatile for whatever you have on hand. 

I recently found this frozen fish at my local Big Y- they run buy 1 get 1 sales frequently and I stock up. Good to keep in the freezer for days like this. 

What do you need?!
- EVOO
-brown sugar
-grainy Dijon mustard
-salmon fillets defrosted
-butternut squash cubed
-Brussels sprouts halfed

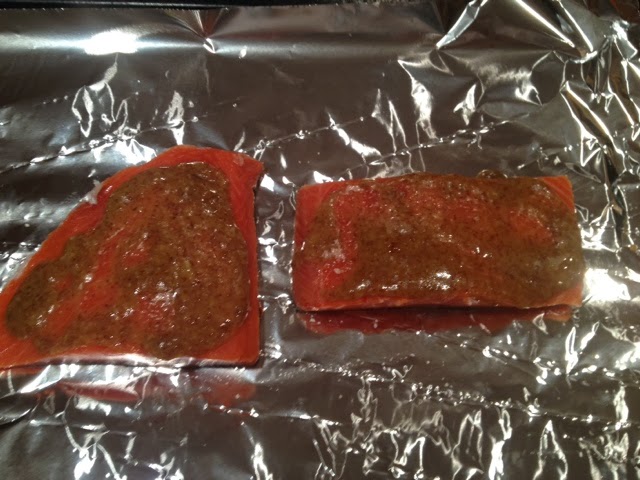
Easy peasy- mix oil mustard and sugar to taste in small bowl. Salt fish then rub with mixture over top. Place on foil on broil pan


Toss squash and Brussels with olive oil and garlic salt in baking dish. 


Throw everything in oven ( fish on top rack, vegs below) Set oven to high broil setting and cook 12 minutes. 

If you like your veggies more soft then take fish out after 12 minutes and then turn oven to 400 degrees for another 5-10 minutes to cook veggies through. 


Enjoy!!

You can use this glaze on any firm fish, or even chicken. Roast whatever vegs you have on hand the same way too.  I've done it with asparagus, broccoli, carrots, potatoes, zucchini, eggplant etc. Good tip for using up left over produce from earlier in the week. 

Monday, November 18, 2013

What's Cookin'- Sunday Gravy and Veal Parmesan


Have I mentioned that Sunday is my favorite cooking day?! I usually have some extra time to make something that is more time consuming without the stress of getting it on the table quickly after a full day of work.

This weekend it was time to make up a batch of my gravy. Yes gravy- I am one of those Italians... Although after 9 years of marriage to another Italian I'd be lying if I said the word "sauce" hadn't been thrown around once or twice but I'm sticking to my roots on this one!!

Now people tend to be very territorial about their gravy recipes, all claiming to have the best secret formulation. Mine is more of a method than a recipe as I never quite make it the same way twice. It's pretty simple and I'm all about sharing. I can't promise it's better than your Nonna's but I can say it beats a jar any day!   A few minutes of work up front is all it takes. 

Of course I  just gotta have some veal parm to go with it. ( all you veal haters-gasp!- use chicken instead!)

And for fun I'm throwing in a bonus recipe for my mom's "eggs in the gravy". I always thought this was some authentic Italian dish that my mom had growing up in Italy but at 37 yrs old I've yet to meet another Italian family who makes this so I guess I'm chaulking up to a "Mancuso" thing!


What do I need???
Gravy
-1 large can tomato puree
-1 large can crushed tomatoes (pay more for San Marzano: totally worth it)
- small can tomato paste
- yellow onion (diced)
- garlic garlic garlic
- carrot (shredded and then chopped)
- good quality olive oil 
- assorted spices ( basil, oregano, bay leaf, onion powder)

Veal Parm
- thin sliced veal cutlets
- seasoned bread crumbs
- scrambled egg whites
- Parmesan cheese
- shredded mozzarella 
- gravy 

Total Prep and Cook Time- 
Gravy- as long as you have, recommend 2-3 hrs
Veal parm- 35 min

**Food Tip** Always pay more money for Parmigiano-Reggiano which is the only true "parmesan" cheese. The domestic stuff does not even come close to comparing. The real deal has a more granular texture and little salty crystals throughout it that gives it all the flavor. A little goes a long way and it lasts forever in the fridge.

Grab a large heavy bottom pot and heat up a few glugs of olive oil. I use this Dutch oven which is one if my all time favorite kitchen splurges. There isn't anything you can't do in this pan, seriously get one!

Once oil is hot add in your chopped garlic, onions, and carrots and cook down until soft and translucent. . .


Then add tomato paste and stir well to melt it in. .  .


Next add in tomato puree and crushed tomatoes and stir well.  Fill up the can with water and add it in as well. You will want to add at least 1 can, more depending on how thick you like your gravy.  I usually add 2 cans of water because I like it a little thinner.  As it cooks the water will evaporate out.


Season it up with whatever you have on hand in the spice cabinet, a little of this or that to your taste will work fine. I add dried oregano, garlic salt, onion powder, sea salt, pepper, basil and a bay leaf. 
**For extra flavor you can add whole peeled onions, a piece of red pepper, and even a parmesean cheese rind** See tips at the end for adding meat.


Bring to a boil and then cover and simmer and let it go all day, stirring occasionally whenever you're around the kitchen. . .

About 2 hours into cooking add a couple tablespoons of sugar or even honey to cut the acidity (a tip from my dad who if I must admit makes a mean gravy)


And then 2-3 hours it is all thick and rich and ready to go!!  (see how much evaporates? At this point I'm always asking myself why I didn't think to double the recipe!)


So for the veal, you could make it pretty much ahead of time and even steal some gravy while it is still cooking to prepare it.

First dip veal in egg wash, then dredge in breadcrumb/parm cheese mix, then into a HOT skillet with EVOO

Fry in hot olive oil just long enough to hold breading on- remember this is headed for the oven and no one wants over cooked chewy veal. About 1 min per side. . .

Put some gravy on the bottom of a baking dish, layer in fried veal, then cover with gravy and lots of shredded mozzarella- the more the merrier!  


Cover with foil and pop it in a 350 degree oven for 25-30 minutes until cheese is all melty and bubbly... DONE!!


All you need now are some sides (you can never have enough things to put gravy on!  I boil up some pasta and we sometimes have my mother's "eggs in gravy"

This is super simple, pour some gravy in frying pan, carefully break eggs into pan making sure to space them out some.  Spoon some more gravy on top to cover the eggs. 


Cover pan and simmer on low for 15-20 minutes until eggs are set and that's it! I know this is weird but it is surprisingly delicious- try it!!


Put it all together and there you have it- just needs a good glass of red!


**For those picky kids- I got nothing for you on this one. Gravy goes on everything. I just tell Lucia that if she doesn't eat it we will have to call her Lucy instead because she will lose her italian status lol**


**Wanna switch it up?!!**
- to add flavor the gravy throw in some browned meatballs, sausages, or even raw chicken breast at the beginning of cooking
- toss in fresh basil at the end or a few  glugs of red wine

Buon appetito!

Sunday, November 17, 2013

Sunday Morning Donuts


Sunday is always a big cooking day in the Perkins' household. It's one of the rare days that I can laze around and have fun with it. We don't need much of a special occasion to make a fancy breakfast or dessert here! I recently got a donut pan for my birthday (thanks sissy!) and the girls have been asking to try it out for weeks so today we gave it a shot.  Now I wouldn't typically blog about a recipe I have never tested- I want to make sure that if you are going to bother  trying some of my suggestions that they be worth it BUT I'm gonna make an exception here..

By the way the donut pan is easily found at AC Moore or Michaels and is pretty inexpensive.

What do I need??? **Food tip- unlike cooking, you can't guestimate for baking or it will come out all wrong so I'm giving correct measurements**

- 2 cups CAKE flour - or else lead donuts you will be making haha
- 3/4 cups sugar
- 1 1/2 tsp baking powder
- 1/2 tsp pumpkin pie spice (some must still be kicking around, or else use 1/4 tsp each cin and nutmeg)
- 1/2 tsp salt
- 3/4 cups buttermilk
- 2 eggs, lightly beaten
- 2 tbsp melted butter
- store-bought frosting (it is Sunday morning, im not that crazy)
- assorted sprinkles, decorations etc

Total Prep and Cook Time- 20 min, Yields 12 donuts
Preheat oven to 425 F, spray donut pan with cooking spray


Okay so first things first, measure all dry ingredients in large bowl


 Next stir in the eggs, butter, and milk


Stir until well combined but don't over do it or else you will have dense donuts. . .


Fill each donut mold about 2/3 way full, making sure not to cover the center piece


Pop that bad boy in the oven for 8 minutes,  until lightly golden and "springy"


Let cool in pan for 5 min or so then place on wire rack.  When completely cool just frost the tops and then let your kids go to town with the sprinkles (WARNING- SPRINKLES EVERYWHERE!!!)


And there you have it! Not quite Dunks but still tasty... 


Abigail and Lucia say "Enjoy!"